


Are you looking to find out how to sand floorboards?
Sanding wood floors is easier than you might think and is a fantastic way to breathe new life into tired, aged, or discoloured floorboards. In fact, it’s something of a quick win when it comes to transforming your home – but you’ll need to get to grips with how to use a floor sander first.
Thankfully, you don’t need to be a professional to carry out wood floor restoration. It generally proves much more affordable than ripping up and replacing floorboards altogether and is something you can do yourself with the right equipment and know-how.
HSS Hire is here to help you gather the tools, safety equipment and advice you need to successfully restore your floors! Our step by step guide to sanding floors will help you get the finish you are after.
Step 1. Gather the right tools
Just about anybody can sand wooden flooring, but you’ll need the right tools if you’re to do a safe and effective job of it. As a minimum, we recommend:
- Floor and Edge Sander Hire Pack
- Coarse sandpaper or discs
- Dust bags
- Hammer and nail punch
- Protective equipment (more on this later)
- Dust sheets
- Masking tape
- Vacuum cleaner and floor brush
If you’re unsure where to find the equipment you need for sanding wooden floorboards, speak to the team at your local HSS branch in person or over the phone, or our Live Experts can be found online.

Credit: (BrianAJackson) https://www.istockphoto.com
Step 2: Prepare the floor
To make the job as straightforward as possible, remove everything you can from the room before starting the sanding process. The fewer items you need to shift around as you work, the better.
Next, you’ll need to inspect your floor closely. Any nails or screws that protrude should be removed or made flat using a hammer, ideally beneath the wood’s surface by 2mm. This is a crucial step as nails that protrude from your timber floorboards could damage the machines or sandpaper.
If any of your floorboards are rotten, they’ll need to be pulled up and replaced as early as possible. That’s because we want the replacement board to be level and appear uniform with the original floorboards after sanding and treatment. You’ll also need to fill any significant gaps with strips of wood or paper-mâché.
Finally, give your floor a good vacuum and wipe it so that you’re working with a clean surface.
Step 3: Put safety first
As with many DIY jobs, there are some safety precautions to brush up on and protective gear to don. For example, as your floor sanding belts get to work, the dust produced presents a health hazard.
Therefore, close doors to avoid having particles travel to other parts of your home, and open all the windows in the room for good ventilation. You’ll also want to use masking tape to cover anywhere dust could become trapped, such as sockets and switches, and keep any hanging wires out of harm’s way.
In terms of protective equipment, you’ll need as a minimum:

Credit: (sturti) https://www.istockphoto.com/
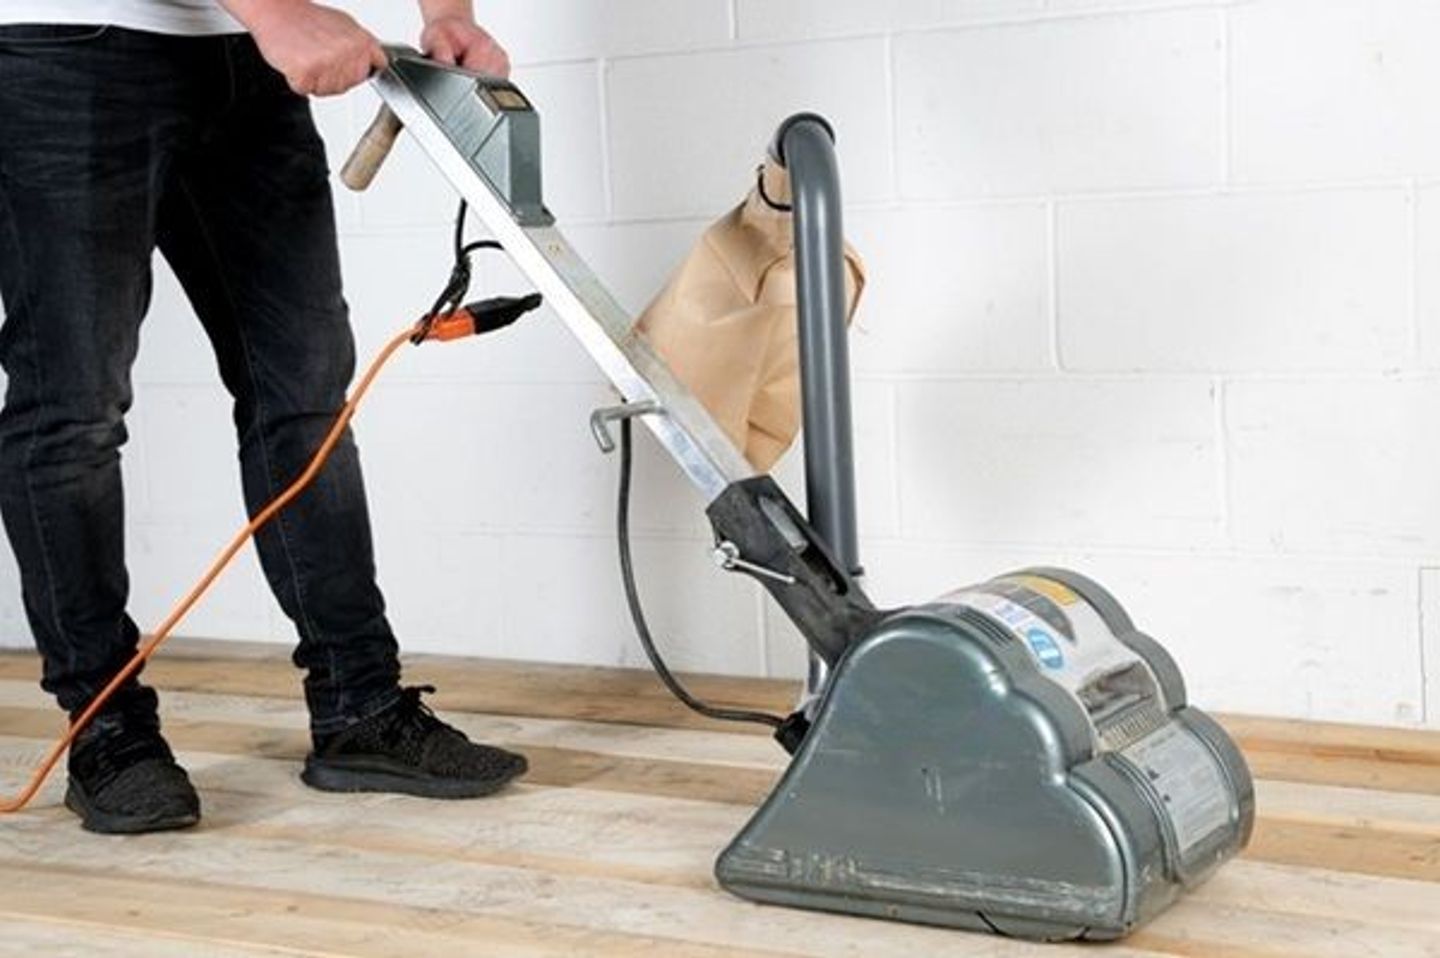
Step 4: Start sanding!
The different types of floor sanding tools
There are several types of sander for wood, and you may need more than one to get the job done:
- Drum Floor Sanders – a large, heavy-duty sander used on the main floor area. They’re excellent for re-levelling floors, but won’t get at details, edges or corners.
- Floor Edging Sanders – a smaller machine that uses a disc to sand the edges and corners of a wooden floor, right up to the skirting board.
- Orbital Floor Sanders – lightweight machines ideal for removing dirt, stains, and varnish from floorboards. These only take off the very top layers of the board, so they aren’t suitable for re-levelling your floors.
- Hand Sanders – compact, handheld devices that make use of belt sanders. They’re great for catching details but would prove time-consuming to use on the main floor area.
Choosing sanding sheets and discs
Once you have the machines, you’ll need plenty of compatible floor sander sheets or discs. But there are decisions to be made here too, as different grades of sandpaper will produce different results. These grades are expressed as ‘grit’, whereby a higher number reflects a finer sheet or disc.
The finer you go, the smoother the effect. For example, you may need to begin with coarser sandpaper for wood to remove tough varnishes and level your floor before coming down to a fine paper that ensures a smooth finish.
HSS stocks a comprehensive range of sanding sheets, discs, and accessories. The guide below provides an easy product selector to help you choose the right products.

We’re often asked how many sanding sheets are needed to sand a floor, but unfortunately, there’s no straight answer. Variables like the size of your room and floor condition make predicting this very difficult. At HSS, we strongly recommend you order more sanding discs or sheets than you think you will need.
Applying sanding sheets and discs
Drum Floor Sander
- With the floor sander switched off, tilt it back onto the floor, lift the front flap and loosen the screws on the sanding drum’s gripper bar using a large flathead screwdriver.
- Push one end of the sanding sheet under the gripper bar and rotate the drum by hand, until you can fit the other end of the sheet underneath too.
- Pull the sheet tight against the drum and re-tighten the screws on the gripper bar. Ensure you re-tighten the screws as close as possible. This will prevent the sanding sheet from ripping off.
- Check the drum can move freely before you begin sanding the floors.
Edging Sander
- With the edging sander switched off, turn the machine upside down and unscrew the centre bolt using the key provided.
- Place the disc on the machine, put the bolt through the centre of the disc and re-tighten, making sure the disc is correctly centred.
- These steps will need to be repeated whenever changing the discs and sheets.

Useful sanding techniques
Before tackling the main floor, it’s often best to start the job by using an edging sander around the room’s perimeter. Unless you’re levelling a floor, always make sure you sand in the direction the boards are laid in and with the wood grain, rather than across or against it.
How to level uneven floors
- If the floor is uneven sand diagonally at 45° across the room in both directions.

How to sand main floor
- Sand in the direction the boards are laid with the wood grain.
- Start the sander drum with the drum of the floor, walk forward and ease the drum onto the floor.
- At the end of the section gradually raise the drum off the floor.
How do I sand painted floors?
The great news about dealing with painted floorboards is that there’s no extra work required. Sanding removes any existing stains or treatments, including paint. Once you’ve finished sanding, you can reapply coats of paint or floor varnish to the entire floor as you please.
Note: These diagrams are based on traditional parquet or wood block floors.

Step 5: Finish and varnish the floor
Once you’ve got your old floor looking good as new, it’s time to make it shine. Finishing a wooden floor is a satisfying and visibly rewarding job. And as with sanding, you can easily do this yourself at home - but it’s essential to be well prepared.
Equipment you’ll need:
- Choice of hard floor varnish
- Wide paintbrush
What type of finish should I use?
What finish is best to use depends entirely on the look you’re trying to achieve. For example, some wood floor stains will dramatically alter the colour of your boards, while others will simply add a gentle sheen for a natural finish.
Some varnishes can be very strong – with lots of odour and a gleaming finish – which some people like to use for parquet-style flooring. Meanwhile, oils will generally look more natural, particularly those at the fainter end.
Drying times will vary; however, it’s best not to subject a newly coated floor to heavy traffic within the first three days.
Preparing the floor
Start by vacuuming and cleaning the floor with a rag, ensuring you’ve cleared any dust left over from sanding. Inspect the floor carefully. Spot fill missed cracks and nail holes. Allow the filler to dry hard, then sand with the same grit sandpaper as the final machine sanding sheet.
How to apply floor varnish?
Get your brush or foam roller. Check the instructions on your varnish or oil tin to determine how many coats are needed. If you can’t complete the varnishing in 24 hours, lightly sand the floor before applying another coat of varnish the next day.
Open the windows in the room to ensure it’s well-ventilated. Stir the floor varnish well. Then, use a broad brush to begin applying the varnish in the direction of the wood grain. Be careful not to overbrush, or you will spread the varnish too thinly.
Before the final coat, lightly rub-down the floor with fine sandpaper and wipe over with a damp cloth. Leave to dry for the product’s recommended drying time.
How do I oil a floor?
Oiling a floor is the same as varnishing a floor. You simply need to clean the surface, apply the recommended number of coats with a brush while following the grain, and leave to dry.

Credit: (pamirc) https://www.istockphoto.com/
Frequently asked questions
How long does it take to sand a floor?
It’s hard to say without knowing the size and condition of your flooring. But with the right tools (like a drum sander and edger), you should do three sanding passes in an average-sized living room or bedroom in a day.
Do I need to sand the floor before varnishing?
Applying another layer of finish on top of existing varnish or oil – or indeed years of dirt – can have unpredictable and undesirable outcomes. To varnish a floor, it’s always best to strip any existing topcoat off through sanding.
How do I maintain the floor afterwards?
You can keep your varnished floor looking good day-to-day through sweeping and vacuuming. Avoid using an excess of water on a varnished floor, and blot and dab any spills or marks instead of scrubbing.
There are many specialist varnished floor products for when your boards need a deeper clean, including polish, which revives the finish and repairs scratches to the coat.
Hire sanding tools from HSS
And that’s that! With just a few days’ effort, you’ll have a rejuvenated wood floor that looks and feels brand new. If you’re planning to sand your floors as part of a wider renovation project, you’ll find all kinds of useful tips and guides on our HSS Blog.
Or you can head to our website, where you’ll find all the tools you need available to hire or buy to transform every part of your home.


